Monday, June 26, 2017

A New Trailer

I've always been plagued by crappy boat trailers with lights that never work and very questionable safety margins.  Currently I have 3 trailers in the yard, one of which I bought new in the 1990's and for my O'Day Daysailer and the lights have not been fully functional on it for many years.  It seems that the wiring harness on these trailers are just awful and break very easily.  Another one of the trailers for my Force 5 actually has working lights, but the trailer itself is kind of a disaster.  I had it welded last year to hold it together, but I really don't think it's very safe.  The third is just a hot mess and it just needs to be cut up and thrown away.  It's that bad.

So the new boat is going to need a trailer and I've been looking on Craigslist for several months now and haven't found anything suitable. Either they are too long or too crappy or are too stiff for such a light boat that I expect the Apple to be.  So this weekend I finally decided that I am sick of looking for another disaster so I went out and bought a new one.

It's a galvanized Karavan KBE 1250 and it has sealed/submersible LED lights that actually work and are bright.  Woohoo.  I'm sure I will break the harness somehow in short order, but at least it will not shake the boat apart.  It has the new style torsion suspension that I'm told has a less bouncy ride.

I have to spend some time setting the boat up on it though because the rocker of the hull does not allow it to sit flat on the bunks and there is currently only one roller up front.  I think I will add another roller aft to support the hull weight, but I'm not really sure the best way to handle it (suggestions are appreciated).


Friday, June 16, 2017

Moving Aft

With the forward deck area roughed in, it was time to move aft and fill in some structural details that should really stiffen the boat up.  As I've said in previous posts, I have gone rogue for the interior and other than a few vague reference points, I am not working off the plans anymore.  It's not that they aren't good, I just wanted something a bit different.

So with that said, I spent a fair amount of time staring at the empty hull trying to envision where everything would go and how it would fit.  After many beers and many days, I finally arrived at an executable plan.  Part of the consternation I had came from deciding the elevation of the floor which dictates the elevation off the hull of the frames.  I ended up running a taught string fore and aft and found an elevation that would allow for flat floors for the entire length of the cockpit and a transition area to seat with watertight tanks on each side.  To add to the mix, I'm planning on a removable thwart to allow for a sleeping area when not underway.

Once I established elevations with the string, I made hot glue templates at the frame locations and cut out the 4 frames needed with the bandsaw.  After a few adjustments with the rasp to get everything fit well, I mixed up a batch of thickened epoxy and fileted them in place.

After letting them cure I made templates for the side panels of the cockpit seats. Since these will be watertight, they are extending down below the frames and will be filleted and taped to the hull.  I notched out the location of each frame for both sides and got them fitting in place nicely like an interlocking puzzle.  I cut white pine stringers (I think that's the wrong word) to add some rigidity where they mount to the frames and epoxied everything in place.  I know that eastern white pine is not particularly rot resistant, but it is light and all of it will be encapsulated in epoxy and not continuosly exposed to water, so I think I'm good.  Plus around here it is really cheap.

After waiting for another cure cycle I cut more stringers to help strengthen up the top and to act as a surface to mate the top of the seats to and did some more epoxying... The endless small bits glued into place that have to wait to cure is getting old at this point, but what can I do.

Finally, I made templates for the top of the seats, but left the forward section open for now.  I plan on mounting a bulkhead bilge pump (Whale Compact 50) on one side so I want to have an access panel from the top for servicing, but I haven't decided which side to mount it on yet.  The side that I don't mount it on will end up being epoxied in place.  The other, more practical reason for not cutting the seat tops to full length is that I am trying to save wood and only have a 4'x4' sheet left.

Next up I will be taping the frames over the filets with 75mm tape as well as the bottom of the seat sides.  I'll probably hold off gluing the seat tops in place until I get some of the aft deck framing completed.


Thursday, June 8, 2017

Decked

I have not been good about keeping up with the blog over the past few weeks, but I haven't been idle. In fact, I've done a lot of small bits of work that all add up to serious progress, but it's tough to know where to start.

I guess the best place is where I left off last time with the forward section;  I had begun to put in the deck beams at that point and had finished up the structural pieces for the mast step and partners.  I continued on with more deck beams and settled on a hatch configuration (rectangular 250 x 380 mm). Epoxying them in place proved to be a bit of a challenge because there wasn't a lot to clamp to so it took a bit of creativity to get it all done.

As I progress further into the build, I'm amazed at how the little stuff really slows you down (especially when there is epoxy involved that has a cure time).  It seems like the net change of the boat is much smaller than at the start, but that's what everyone tells you; I just didn't want to listen.

Anyway, once I had all the deck beams in place I put three coats of white rustoleum paint in the forward area that would be soon be covered by a deck and only accessible by a hatch. I also did three coats in the cubby areas adjacent to the mast step that would also only have access via deck plates. The paint took a considerable amount of time to dry because the temps were cool, so it ended up taking many more days than I had hoped.  Once the third coat was mostly dry, I started fitting out the deck.

I used the same 6mm plywood for the deck and once I had it fitted nicely (I used 2 pieces to span the area), I buttered everything up with epoxy and screwed it in place with #8 3/4" SS screws.  Once that set up, I ran a thick filet down each side of the hull and covered with 75 mm tape to really tie it into the hull. I will eventually sheath the whole deck in 6oz cloth just to provide a little more strength and abrasion resistance, but I'm calling it good for now.


Saturday, May 27, 2017

Beefing it Up

Since last week, I fileted and taped up all the new mast step components to the hull and feel that it really stiffened up the front part of the hull.  For the next step, I wanted to really beef things up so all the loads imposed by the unstayed mast will be properly transferred to the hull and nothing will break (cross fingers).  

To do so, I needed to beef up the framing members at the mast partners so the loads will distribute laterally from the partners to the hull via these new members.  Additionally, I decided to add a false bottom forward of the mast step that will tie the bow and sides into the mast step that should reduce or eliminate any twist caused by the loads.  

I started by measuring out a longitudinal frame running from the mast step to the bow about 100 mm above the keel.  I glassed that in place with thickened epoxy and after it had kicked, I coated it with unthickened epoxy to encapsulate the wood and added some douglas fir stringers along the top edge to receive the false bottom.

I left the aft section clear because I was planning on putting an inspection port in that spans both sides of the frame.  I let it all cure for a day and then created a template with the hot glue gun and some random sticks to pattern the false bottom.  I transferred the pattern to 6 mm marine plywood and cut it out for a first fitting.  A little work with the rasp and it all seated quite nicely so I went ahead and cut out a hole for the inspection port prior to gluing it up.

I coated what was to be the bottom side of the false bottom with unthickened epoxy to seal it all up and after letting it kick, I mixed up a batch of thickened epoxy and ran a bead along the longitudinal frame and smooshed the bottom in place.  I fileted the bottom to the sides and mast step bulkhead before letting it all kick.  I stopped back at the shop later that evening after the epoxy had cured to the touch and mixed up a small batch of unthickened epoxy and taped the bottom to the hull and mast step bulkhead.  

The next day I started beefing up the top of the mast partners by epoxying in 25 x 35 mm mahogany pieces that run from the mast step along frames 10 and 11 to the sides of the hull to distribute the load from the partners to the hull.  I morticed a notch on each side of the aft piece for the beginnings of the deck framing as well.  I feel like I'm using all the wrong terms here and I'm guessing all of these pieces have specific names, but the pictures below should give you an idea of what I'm talking about.


Tuesday, May 23, 2017

Forward

I'm definitely moving forward, both literally and figuratively.  Figuratively in the sense that I feel like I'm getting a good amount of work done with minimal screw ups, and literally, because I am literally working on the forward section of the boat.

I think I said in the last post that I am going rogue on the interior build from here on out.  I'm still referring to the plans here and there, but not in any measurable way.  I'm winging it and starting with how things are arranged and built forward of the daggerboard trunk.  I still have to abide by physics though, and need to distribute loads from the trunk and mast step, so I started with the idea that I would build a seat/storage compartment between the daggerboard trunk and the mast step to help tie things together.

Since the forward end of the daggerboard trunk didn't land on a specified frame, I broke out the hot glue gun and made a template of the new frame shape with little sticks glued to a 2x4.  Once completed I transferred the template to a sheet of plywood and cut it out on the bandsaw.  The first fitting was tolerable and a few hits with the shinto rasp made the new frame sit just about perfect.

Moving on, I cut and fitted frame 11 which will sit about 200 mm forward of the frame 10 and will be part of the sandwich that makes up the mast step and partners.  For the mast step, I glued up a big blank consisting of sapelle and douglas fir.

Once it cured, I shaped the bottom to fit the curve/angle of the boat and screwed and glued more douglas fir and a 12 mm piece of plywood rabbetted to the fir for the actual step.  This will allow a channel for drainage underneath where the mast fits.  A bit hard to verbalize, so see the picture to make sense of what I said.

At this point I drilled the hole for the mast butt to seat and additional drainage holes and glassed the whole assembly in place.  I called it a day and let it all cure up overnight.  Next up was to fit douglas fir pieces that will serve as backing strips for the plywood that will enclose the mast step fore and aft between frames 10 and 11.  All of this amounts to what will likely be the most complicated assembly for the entire project so I spent a lot of time in
'contemplation mode' to make sure I could visualize everything needed to be done.

Once I was satisfied with all of my dry fits, I filleted in frame 11 along with the all the douglas fir backing pieces and after an initial cure, I hot coated everything with unthickened epoxy.  The next day I glued in the fore and aft side pieces to complete the mast step sandwich.  In the meantime, I cut out some plywood that will be mounted about halfway up the mast step on either side.  These will be glassed in and will serve 2 purposes: 1. they will be a shelf accessible through the bulkhead from the aft end, and 2. the area underneath them will serve as one of the watertight buoyancy chambers.

There is a bunch of glass taping to do in the next few days to tie everything together, but here's what it looks like to date:


Wednesday, May 10, 2017

Going Rogue

I deviated from the original plan since the last post and decided against doing a primer coat before I do the interior.  I did get a good chunk of the weave filled with 2 coats of unthickened epoxy and glassed the transom. I think it's looking pretty good now, but time to move on.

Instead of priming, I decided that it would be best to get the interior fitted before I tried making the hull look any prettier, so I marked and cut out the daggerboard slot and this is where I am basically throwing away the plans.  I plan on a number of modifications to the interior, including the daggerboard.

The plan calls for a 25 mm wide daggerboard with a long slot (basically about the same size as a centerboard trunk.  I talked to the designer about this and I decided that in order to optimize space, I would shorten the trunk because I only plan on building the standard rig, and not the light air rig which requires setting the daggerboard further back.  Additionally, I'm planning on building a NACA0012 foil for the daggerboard and if I keep the chord of the daggerboard at 280 mm, that means that the maximum width of the daggerboard is 33 mm, not the 25 mm as designed.

I won't go into much detail now, but in a nutshell, but NACA stands for National Advisory Committee for Aeronautics and the 0012 designation means that the maximum width of the foil is at 12 percent of the chord.  In other words, it will look a bit like a wing.  In theory this should allow the boat to point a bit higher before stalling.  I think it will be fun to build.  More on that when I get to it.

My son and I moved the boat outside and we flipped it over so I could sand the 50 mm tape in the interior to prep for applying the 75 mm tape over that.  Using 80 grit sanding disks on my 5" random orbit sander I was able to get everything acceptably smooth in about 2 hours.  I vacuumed it out and we moved it back in.

I measured and cut enough 75 mm tape to cover all the 50 mm tape in the bow and mid sections of the boat.  I'll do the aft section a little later, but for now I want to focus on the centerboard trunk and the mast step and forward assemblies.  Using 6 oz. batches of epoxy, I painted out all the 50 mm tape seams and then lay the 75 mm tape in it before moving on to the next.  After a few of these 4 - 5 foot sections, I'd circle back and make sure the previously laid sections were fully wetted out.  I always miss a few spots on the first pass so it's good to go back over them with a brush and squeegee.  Once I finished up I moved onto the daggerboard trunk and let the new tape cure.

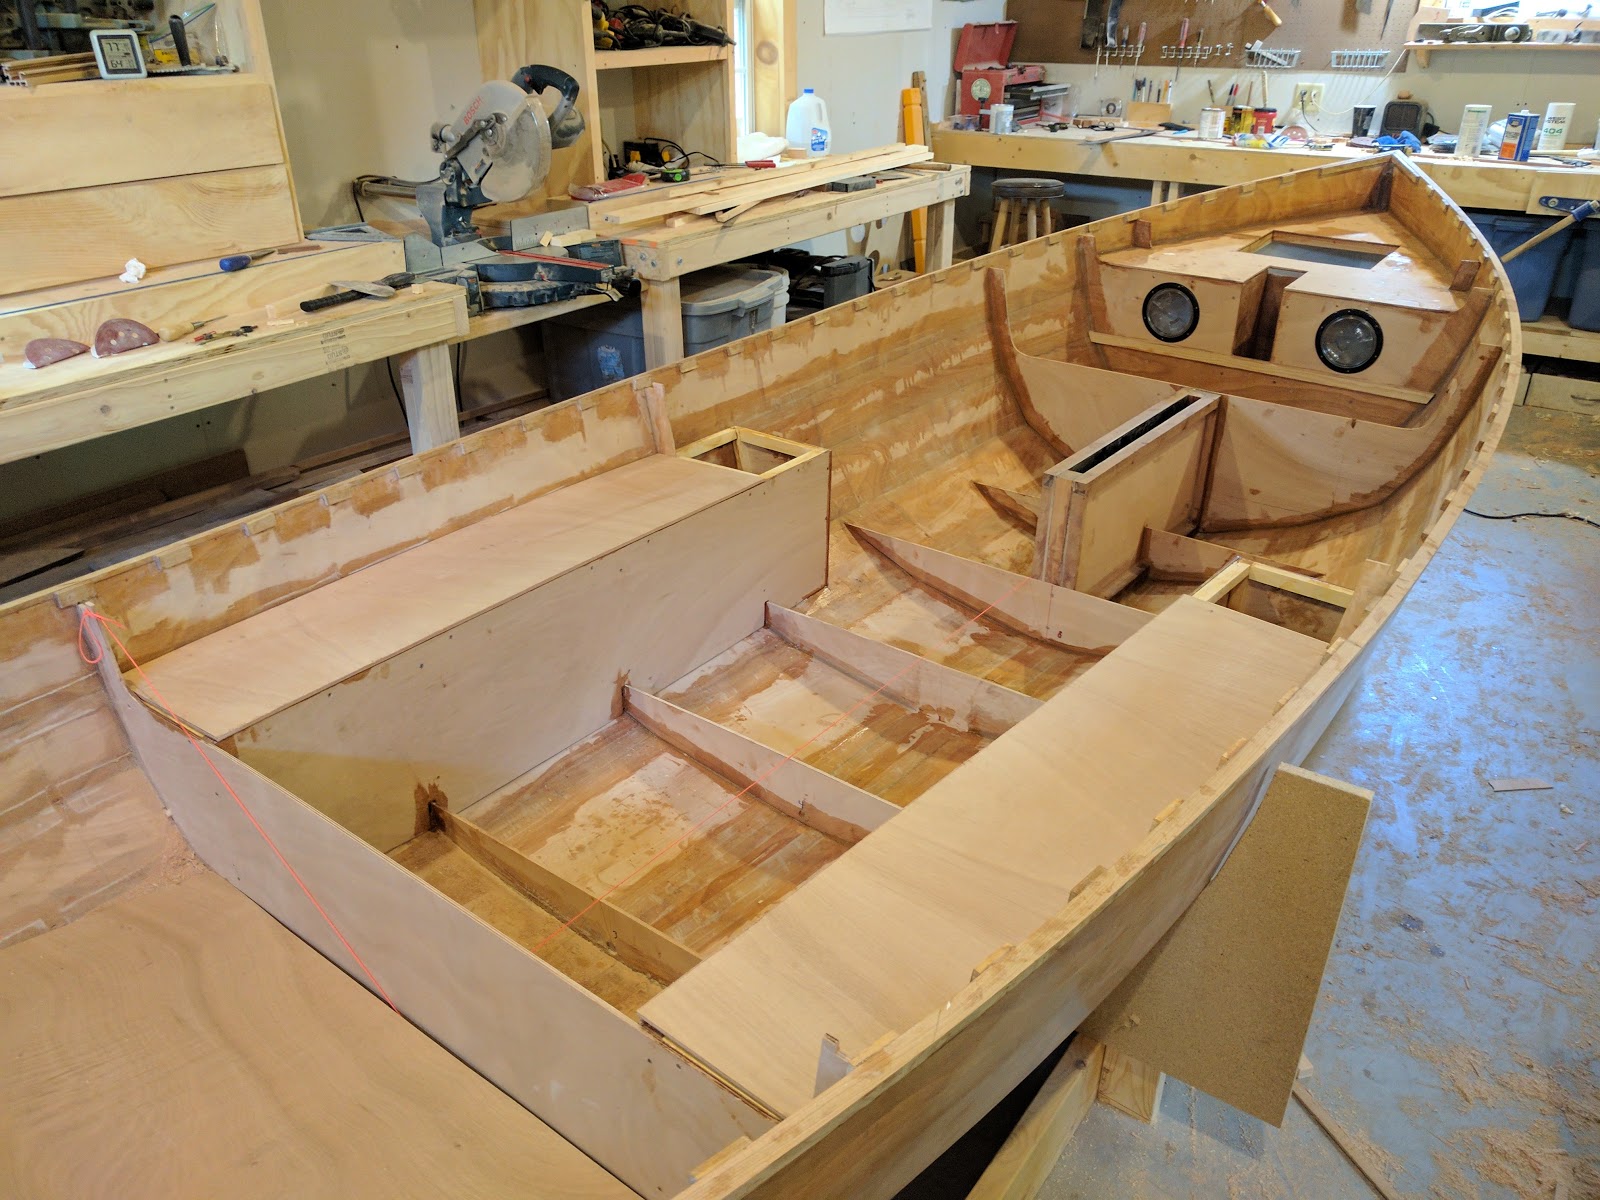
The daggerboard trunk isn't complicated, it's just a hollow, rectangular box with the bottom cut to the shape of the hull so it seats properly, but it takes a bunch of steps to get it all together and ready to fit to the boat.  I should say that I really didn't follow the plans or construction key here at all, but I've done daggerboard and centerboard trunks before, and I know what works for me.  There are really only four things you have to keep in mind:

  1. Make sure your daggerboard will fit.
  2. Install it in the correct location (Center of Effort +/- lead).
  3. Make sure it is built stout enough to take a beating (because it will).
  4. The trunk has to spead the loads imposed on it to the boat without introducing major stress risers.

So to start, I had previously determined with the help of the designer a shorter length daggerboard trunk and located it on the boat (fore and aft).  From there, I scribed the bottom curve onto a piece of scrap and transferred it to the 6 mm marine plywood I planned on using for the sides of the case.  I cut each side of the case out to the proper dimensions and then epoxied what would become the inside of the trunk with 6 oz cloth.

Once that had kicked, I followed up with a coat of unthickened epoxy with 10% graphite powder mixed in.  I let it kick again and repeated with another graphite coating.  The thought behind the graphite is that it is a good 'lubricant' and provides a slicker surface for sliding the daggerboard.  I think there is plenty of debate on whether it works or not, but hey, it looks cool.

I let everything cure up for a day or so and then sanded the sides where the mahogany spacers would be screwed and epoxied into place to maintain the 35 mm desired width (for the 33 mm wide board). I clamped it all together and called it a day.

The next day I epoxied on some bed logs (scribed to the curve of the hull), which didn't seem to be part of the original plan, but I think they are crucial for stiffening up the trunk.  I also added top pieces that will be covered by a trim board once completed. At this point I was about done, so I cleaned things up a bit with a heat gun to get rid of the inevitable gobs that I missed when the epoxy was still wet and sanded and rounded the inside corners.

I fitted the board the next day and to my amazement, it all fit without a single hiccup.  I epoxied it to the hull with some thickened epoxy, and made a nice filet along the port and starboard edges before laying down a 75 mm wide strip of cloth to really tie it in.  Of course there will be frames fore and aft and a vertical stiffener about midway that will further tie it into the boat, but this was a good milestone.


Wednesday, April 26, 2017

Odds and Ends

I'm marching toward getting the hull prepped for a primer coat and there are a ton of little details that have to be taken care of before I get there.  The big thing is spot filling and fairing any anomalies that will look bad once painted if I don't deal with them.  Ideally, when the hull is finished I hope to have a pretty clean looking hull with no cloth print through and no tape 'bulges' along the seams.

All of this makes for plenty of idle time because each batch of epoxy I make up takes a good day to be ready for sanding.  It takes 15 minutes to apply and then you wait. I've gone through several rounds now and I think I'm pretty close to being able to do the fill coat, which should take care of the cloth weave that is currently on the hull.  After that, there will be more spots that I missed and I'm considering applying a 'scratch' coat to the hull before actually priming.

Bonded, filleted, and taped, but pre-fairing compound.
A scratch coat is basically a throw away coat of paint that you apply to the hull to make a uniform color and will help highlight any imperfections. I'm not sure if this is a real term, but I'm making it one now and whatever it's called, I know that I'm not the only one who uses it.  The problem with spotting imperfections now is that the hull color is so mottled it is hard to actually see the surface texture.  I'll get a can of grey spray paint once the fill coat is done and throw it on to see what I've missed.

I have been trying to make the most of my idle time though and took care of a few things that needed to be done.  The first was to fit and mount the skeg.  I had some nice 5/4 Honduras mahogany stock that I cut down to size by scribing the hull curve on and trimming to the transom angle.  This was a four step process where I initially epoxied it in place, then waited till that kicked (not full cure), then filleted a ~10 mm radius along either side.  I left that until it was still a bit green but no longer sticky and applied a layer of 50 mm tape on the filleted sides.  Finally, I waited until that was cured enough to sand and knocked off the woven edges of the tape before applying a layer of fairing compound.  I still have to radius the edges at some point, but that will be just before paint.

The second item I knocked off the list was to clean up the bottom of the outwales.  These had a combination of drips, glops, and edges of the sheathing cloth from previous work on the hull.  They always seem to catch all the gunk that drops and then I forget to clean them up when they are still wet, making more work for me.  This took way longer that I thought and used a combination of a heat gun and sandpaper to get all the crap off.  Tedious is the word for this job.  I finished up by running a small fillet along the hull intersection and filling any imperfections between the edge of the cloth and the outwale.