Wednesday, March 29, 2017

Stitched

So my fingertips are really sore from drilling and pulling almost 300 zip ties to get the hull, transom, and bulkheads stitched, but it's now done. Finally...  It really wasn't too bad, and the sound of the zip tie 'zipping' up and pulling the strakes tight was pretty satisfying.

I'm happy with the results so far, all the seams are tight and the hull is nice and straight.  I kept center lines and the top uncut (straight) on the bulkheads and transom so I could line everything up by sight. I emailed the designer and he suggested cutting out most of the internal bulkhead shape and just leaving tabs in place to cut once everything is glassed in.  I followed his advice on frame 5 but didn't do anything with frame 10 because I'm not sure what I'm going to do with it yet.  I may cut big circles out along either side of the mast, but I may do a top entry on the recessed foredeck, but I'm just not sure yet.

The next step is to start tacking the hull together with epoxy to start strengthening up the shell, but I'm waiting on a tub of wood flour and several hundred yards of glass tape from Jamestown Distributors.  Hopefully it should be here tomorrow and I'll get started.


Monday, March 27, 2017

Awkward!

So I knocked out the rest of the strakes in between various obligations this weekend.  To get myself worked up for boat stuff, I drove up to the Maine Boatbuilder's Show on Friday to see what was happening.  There were a lot of incredible boats there but not much in the way of sail and oar type stuff, except for Clinton Chase of Chase Small Craft. I had a nice conversation with him and really love his 16 foot Calendar Islands Yawl.  I almost wish I had come across the design before the Apple 16, because it pretty much ticks off all the items on my list.  Oh well, maybe next build (he mentioned he has an 18 footer in the works).

Anyway, I had really worked up cutting the strakes out to be a bigger chore than it turned out to be, but by doubling up the strakes for cutting I essentially halved the time it took to get everything rough cut.  It went way faster than I thought and cleaning up all of the rough cut strakes only took about two or three hours with the low angle block plane. The only other thing I needed to do before beginning to stitch everything up was to epoxy a piece of 6 oz cloth along the forward end of the keel strake to keep the stitching from coming out because it is so narrow (as recommended by the designer).  I forgot to take a specific picture of this but it's really straight forward.

So this afternoon after work I found that the epoxy had dried along the strake and I had some time and no good excuse for putting it off any longer.  The stitching is where the rubber meets the road so to speak, and any errors I may have made with the marking and cutting would quickly become apparent.

I marked and drilled out holes at 200mm increments along the keel strake and the port and starboard strake 1 planks and along the plumb bow and started stitching. It was a mistake to stitch the bow together first (even though that is what the designer suggested), because it made joining the keel strake to strake 1.  I eventually cut the bow zip ties and did that last... that worked much better.

It was all very floppy and I found it difficult to keep it in shape so I decided to cut out the outside form for station 5 specified in the plans and attach it to two 2x6 to stand it upright and placed the stitched section in it and clamp it down at station 5.  At this point things got much easier and I ended up screwing the port and starboard strake 1 onto the form to help hold the shape.  One nice thing about the design is it calls for the keel strake to be cut long and trimmed after everything is together. This makes the forward section meet up nicely.


With all of that in place, stitching the second strake on was super easy and was just a matter of drilling out holes for the zip ties every 200mm and zipping them up going from stern to stem. Once I pulled everything tight the whole thing lined up really nicely with no gaps in any of the strakes and it all looks straight.  So far, so good.  Depending on how much time I have tomorrow I should be able to get a few more strakes stitched on.


Wednesday, March 22, 2017

Got Planks

Nested strakes make for lots of lines, hope they're right.
I had four solid hours of time to myself today to work on the soon to be boat and made good use of my time.  After working out a decent system for laying out the planks/strakes last night I got straight to work marking out the last two planks on the first scarphed panel. I was able to layout the remaining two planks in roughly an hour and forty five minutes which, compared to last nights three hour session, seemed like light speed. I spot checked a number of marks to make sure they were right and I'm fairly comfortable that I got all the measurements correct (cross fingers).

As I was finishing up I was thinking about how long it's going to take to get all of these planks cut when it occurred to me that after I cut these planks out I could use them as a pattern for the next scarphed panel. I suppose this revelation should have been obvious, but it wasn't to me.  Then I thought, why not just cut both panels at once, then I get two of each plank matched exactly.

That brought me to the next question which was "how am I going to cut these planks?"  I hadn't really thought too much about it before because I was focusing on getting the layout correct, and I didn't really think that I would be at that point today, but here I was.  I had unconsciously assumed that I would use my jigsaw, but I have never been happy with the speed or the lumpy cuts I always seem to get because even a millisecond's inattention is enough to change the direction of the saw.  I always cut proud of the line, but cleanup is always a chore.

That got me thinking about using my Bosch 7-1/4" circular saw to do the cuts. When I built the shop last summer, I spent a huge amount of time with that saw and I got really comfortable with it.  The cut line gauge is really accurate and it doesn't wander like a jigsaw and as long as the radius isn't too deep, it can follow a curve nicely. Oh, and it is Way faster than a jigsaw.

The blade was pretty dull from the shop build, so I ran up to Home Depot and got a Diablo 60 tooth thin kerf blade, mounted it, and got busy.

I lined up two of the scarphed panels so the edges matched up, screwed them together with a few wood screws and started cutting.  It took just under an hour to cut all the planks out with a few breaks in between to let the dust settle and I'm really happy with how they turned out.  No oops, crap, or whatever; it just worked and worked well.  Every edge is smooth and about 1/16" proud of the line.

Nice smooth cut, just proud of line.
So, to make a long story short, I went from being overwhelmed with how much drudgery work I had to do, to having eight of the eleven planks cut out and nicely matched.  I still have to mark out and do the same operation on plank number five and cut out a single keel strake, but I feel like I over the hump and may actually start making the wood look like a boat next week.


Can't even see that there are 8 planks; the benefits of stacked cuts.

Tuesday, March 21, 2017

Laying it All Out

I have been pretty excited about getting started on the strake/plank layout and I finished up the cleanup of the last scarph joint last night so I got started at lunch today.  I spent a fair amount of time making sure I understood all the strake layout plans and how to transfer them to the plywood panels. Fortunately, Tom Dunderdale (the designer) did a great job of providing clear, concise strake plans in a number of forms.

Illustrated strake layout
There is both an x-y coordinate sheet and a nicely illustrated version that marks the strake dimensions visually along the shape of the plank. I ended up using a combination of both, mainly because reading off the x-y coordinates is faster, but I double checked visually on the illustrated version.

To get started, I had to setup a reference line to measure everything off.  The illustrated plan showed an 8mm reference line along the bottom of the scarphed panel and all the first strake measurements are built from this line. Once I had that drawn the entire 16 foot panel, it was simply a matter of marking off the x-y coordinates for the top and bottom of the strake.

To make sure I could go back and double check measurements, I did all the x coordinate lines first and labeled each one before going back and doing the y coordinates.  Pretty painstaking and monotonous work, especially considering there are x-y coordinates for both top and bottom lines of each strake.  After completing all the coordinates for the first strake, I tacked finish nails into each coordinate and laid a wood batten on them and drew the curve.  Very satisfying when you step back and see the strake's shape emerge from the plywood rectangle.  Especially when it actually looks like what's on the plan.

Between the monotony of marking out the strakes and being on my knees for 3 hours (yes it took about 3 hours), I only finished two strakes tonight.  I think the rest will go a bit faster now that I have figured out a bit of a method, but it doesn't take long before the numbers start repeating in your head and mistakes are made.  Towards the end I had to correct a few small dumb errors, so I figured I should quit while I was ahead.  Marking the coordinates down on each point will make it easier to double check before I actually make the cuts when I get there.


Monday, March 20, 2017

Scarph It Down

It's been a few weeks since I last posted; the call of the ski slopes kept luring me away from getting busy, but I will use the "it's too cold for epoxy" excuse for practical purposes.  Fortunately, I finally managed to get over to Goosebay lumber and purchase six sheets of 6mm Okume marine plywood and had enough time this weekend to get to work on scarphing them together.  Once these 6 sheets are glued together and diced up into appropriate shapes, they will provide enough wood for the basic hull to be built.

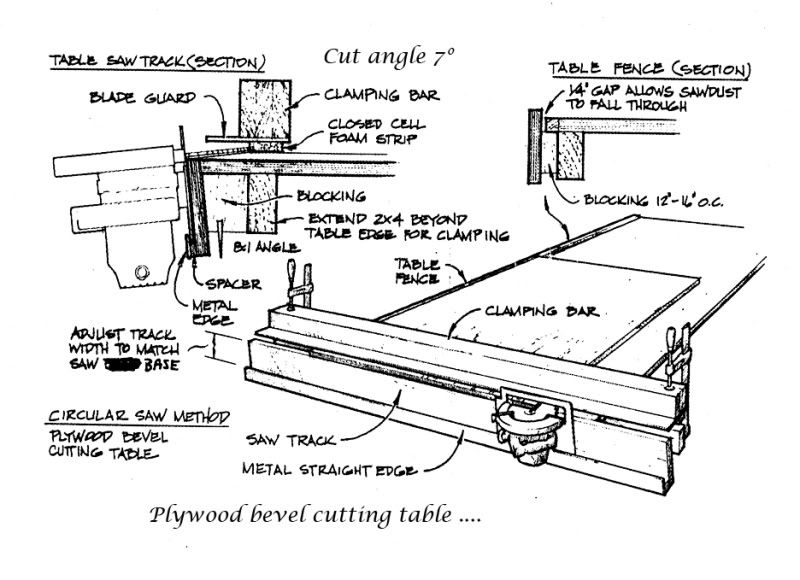
I have been pondering the scarphing part of the build since I purchased the plans earlier this year and spent what seemed like a huge amount of time researching the ideal method for accurately scarphing plywood panels.  I say ideal because I mean 'best for me', not what may be the absolute best if time and money were no object.  There are a ton of methods that range from simply using a block plane, to complicated router sled jigs and everything in between.  After weighing all the options I chose to go with a circular saw jig that combines simplicity in design with speed of cut once setup properly.

The design I chose is nothing more that a large bracket that clamps to my manning bench with an 82 degree face angle that allows a circular saw to ride along and cut the scarph at an 8:1 ratio.  I constructed it out of 2x4s and some 3/4" Melamine shelving so the circular saw will slide along smoothly.  The hardest part of building it was figuring out the blade offset from the fence so I could attach a metal rail for the fence to ride along.  All of this is explained much better with pictures so hopefully they will give you the idea.

Once completed I tried it out with a few pieces of 6mm test plywood to make sure everything was working as expected before I jumped in and started slicing up $75 per sheet plywood.  All went well and was able to cut all six sheets in about 30 minutes.

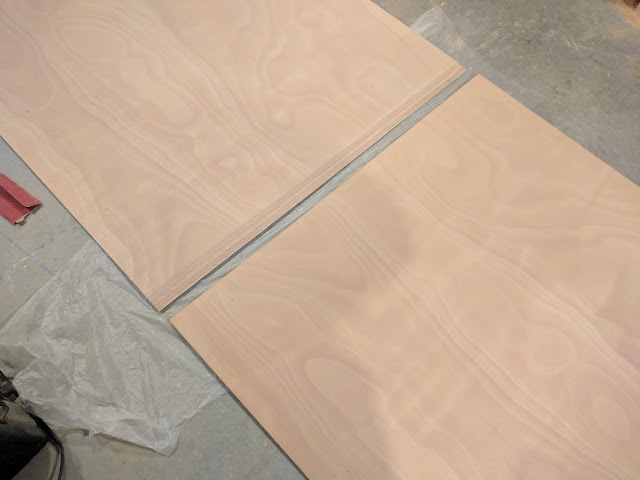
Next I stacked three at a time and hit them with my random orbit sander to clean up the cut so everything was nice and smooth and made sure they fit together nicely.  To glue them up I had to clear out a space on the floor and then lay them out with a piece of plastic sheeting under the section I would be gluing up.  I test fit the joint and then mixed up a small batch of epoxy slightly thickened with 404 filler and smeared it on both surfaces with a disposable brush and then 'clamped' them together by placing another sheet of plastic over the joint followed by a flat 2x6 and a 30 pound toolbox.  After that it was just a matter of waiting for the glue to dry and then sanding the surface down before repeating two more times for each subsequent plywood pairs.

Next up I'll sand down the glued joint to smooth everything out and then start marking out the strakes on the panels.  I've never done strakes this big before, so I'll be taking my time to make sure I get all the measurements correct and then go back and double check before I cut a thing.


Wednesday, March 1, 2017

Spars Spars and More Spars

So I haven't been totally idle for the past two weeks, but there hasn't been much to report on that I haven't already said.  I just finished up the mizzen mast and the main boom in birdsmouth fashion and while it has been pretty satisfying building these things, there is a lot of sanding and planing that gets a bit tedious after a bit and I think I'm ready to move on to the hull.

Notably missing from the completed spars so far are the main and mizzen yards, the mizzen boom, and the boomkin.  I am certain that I will do the boomkin up with the birdsmouth method so I can run the mizzen sheet through the spar instead of mounting a block (There are several nice examples here: woodenboat forum).  I'm not entirely certain I will do the yards and mizzen boom in birdsmouth because they are so small in diameter as it is, I don't know how much I will gain by going birdsmouth with these.  I suspect there is some equation of diminishing returns that can be calculated based on diameter of spar and a few other factors; I'll let you know if I come up with it.

Asymmetrical? No, not really.
Anyway, the mizzen looks like a tiny main mast, but only 2305mm compared to the 4545mm for the mast.  The boom is a bit more interesting in that it is tapered on either end, but slightly differently. On one end, the taper goes from 65mm to 45mm over 750mm, while the other end does the same taper in 400mm.  It added up to a little more care with planing (both electric and hand plane), but overall, the process is identical.  The plan's line drawing actually show the boom tapered asymmetrically, but I contacted Tom Dunderdale and he said that the taper is symmetrical and to treat it as such.


The boom I plugged either end with octagonaly planed pieces of 120mm mahogany (< 5 inches) and the mizzen got the top end plugged with mahogany and the bottom got a similar birdsmouth plug treatment as the main mast.  I finished up tonight by getting everything sanded down to 150 grit paper and ready for Deks Olje oil finish.

I will probably get a coat or two on before I move on to the next task, but I hope to actually purchase the plywood next week sometime and start the scarfing process to get the long panels I'll need for the hull.