Thursday, February 16, 2017

Birdsmouth Part 3 - Whittling

After the final glue up, I let the spar sit for a few days to make sure it was fully cured and then we got a bunch of snow, and then some more snow.  It was fluffy and soft, and it called me to go play in it. So I did.  I managed to get lots of first tracks with my trusty skins and then followed up with lots of skiing at Ragged Mountain.  So if the snow holds out, I'll be doing as much skiing as possible until the end of March.

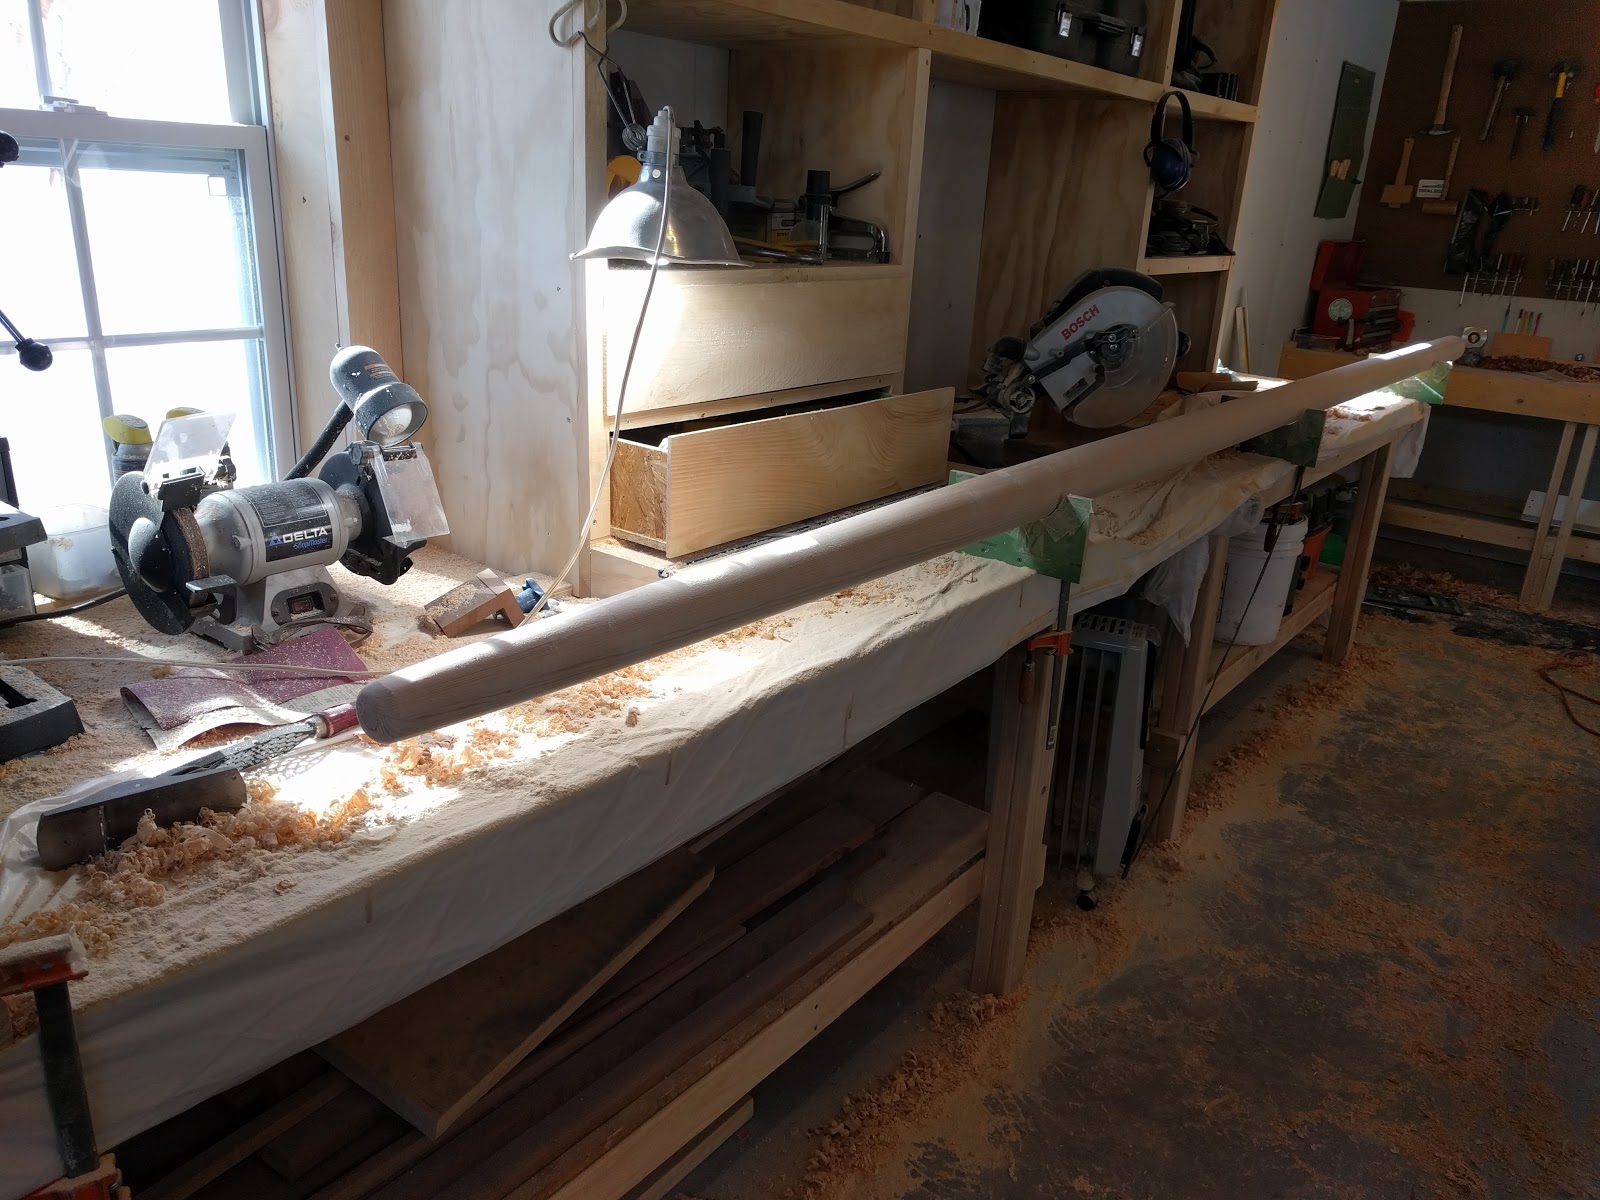
Even though I didn't spend much time in the shop over the past two weeks, I did manage to get the mast whittled down to a round cylinder like object.  

To make the mast round, I started by knocking off the edges of the 8 sides and cutting it down with a hand held power planer until I had 16, then did it again to 32 sides.  At that point I switched to 60 grit sandpaper because I was terrified of what might happen if the power planer slipped and took a huge chunk of wood out of the spar after all the work I had done.  In retrospect I probably should have sucked it up and done a little more work with the power planer, or switched to a hand plane, because the sanding took a long, long time.


Still, it was pretty satisfying watching and feeling it go from angular to round even if it was slow going.  I found a heavy cardboard shipping tube in the basement that was really close to the diameter of the spar.  I cut it in ha
lf about 8" long and I spray glued a piece of 80 grit paper to the inside. After it dried, I put the paper grit of choice over that.  The spray on piece is just there to provide friction to the inside of the half tube.


Then it was time to make some dust. I kept going with 60 grit until I was happy that all the flat spots were gone, I switched from 60 grit to 80 and did 2 passes over the whole spar. Then I moved on to 100, 120, and finally 150 grit for the final passes. Along the way, I shaped the top end into an nice rounded nub.

Overall I'm happy with the result and my final diameter is 91mm at the bottom and tapering to 52mm at the top.  I probably could have kept sanding to get the diameter down to the 90mm and 50mm specified in the plans, but enough is enough.  Although it is a bit heavier than I'd like at just under 25 pounds, I don't know I could have done anything to prevent that other than using Sitka which is a lighter wood, but much more expensive.  I still need to cut the beehole at the top and figure out the shape of the bottom butt arrangement.  I will probably round that as well.


Sunday, February 5, 2017

Birdsmouth Part 2 - Gluing it Up.

Reprinted from Duckworks Magazine
Late last week I was marking out the taper on the staves for the top of the mast where it reduces from 90mm to 50mm and I happened to check my email and found that another Campion Apple builder had seen my last post where I had assembled the roughed out staves and was about to cut the tapers.  He suggested that I don't start the taper so low on the mast 1450mm from top; instead, I should just taper the area above where the yard connects at about 200mm from the top.

Sneaking up on the 50mm taper line
He said that I should go with a stiffer spar, so I adjusted the taper to go from 90mm diamter at 1450mm from the top to about 70mm about 200mm from the top and do the last 20mm taper (to 50mm) in the final 200mm from the top.  I probably didn't explain that very well, but to make a long story short, I did a more gradual taper until the last 200mm and then got it down to 50mm much faster.  To actually get it done, I ganged up all staves, laid them out on the floor and clamped them together.  Then I took my 22" bench plane and set to work on the gradual section before finishing off the steeper taper with a jack plane.

Bottom end of plug
Once I was satisfied, I cut out a second, smaller set of staves ~1 meter long that I will use for the bottom plug (the designer calls for a solid mast for the bottom 1 meter with no hard  transitions. To do that, I had to to cut the top ends of the staves so that their thickness tapered from very thin to regular thickness along the top 200 mm.  I managed to get it close to correct on the first try, but I will have to thin the top a bit more with a rasp before I install it.

 In the comfort of my warm basement at the house, I glued up the plug and had to wait out a particularly cold spell that I knew would prevent me from getting my shop above 50 degrees F (minimum glue up temp).  I just don't have the room in the basement to glue up a 15 foot mast.

This weekend I scrounged up a third space heater and tested it out with the other two and was able to keep the temp in the shop up around 60 F even though temps were roughly 12 F.  I decided it was time to get it done and glue it all up; sort of.


My plan was to glue everything up except for staves 1 and 5 (I put packing tape on the square sides) so I could split the mast apart once it was mostly glued up.  I enlisted the help of my wife and son to hold various sticky pieces while we wet them out and got them into position.  To make a long story short, it all went well and we got all the staves into place and then I hosed clamped them tight to cure for the night after using 24 ounces of epoxy.

This morning I got up early and was happy to find the shop warm and the epoxy nice and hard.  I split the halves apart and pulled the packing tape off each side so I wouldn't forget later and then spent some time with a heat gun cleaning up some of the inside drips at the top and bottom of the mast where the plugs would go.   Since I already did a lot of prep work on the bottom plug, I was able to adjust and fit it snug in short order and then rasped out the tapered end to ease the transition from hollow to more solid.

For the bottom plug I found a nice piece of Honduras Mahogany that was a cockpit deck beam on my Alberg 35 in a former life.  When I rebuilt the cockpit in that boat, I couldn't bring myself to throw away those perfectly good and really lovely wood even though the rest of the cockpit was a soggy mess. I'm glad I didn't, because it was just a dream to shape down into a 200mm cone for the top plug.  The perfect grain allowed my block plane to shave off delightful and very satisfying curls of wood.


Once the top plug was fitted, it was time to epoxy it all back together again.  This time I didn't have any help, but didn't think it would be a big deal to do it myself.  It ended up getting a bit hairy because I miscalculated how much epoxy I would need to get the plugs set and ended up doing 3 - 9 ounce batches.  By the time I got finished spreading out the last batch, the first batch was pretty close to kicking, so I got it all clamped up as fast as possible.  It was just in the nick of time because when I was cleaning up the squeeze out a few minutes later, I could feel the excess staring to get that weird coagulated state consistency that epoxy gets when the reaction gets going.  I went over to the shop and checked on it a few times tonight and on my last visit I was pleased to find very little tackiness left so I'll be able to pull the clamps off tomorrow and starting cleaning it up.


Saturday, January 28, 2017

Chirp Chirp, It's a Birdsmouth

I've been itchin to get started on the Apple Campion build ever since I purchased the plans but in addition to getting the shop in order, I have been without a truck since my son decided to ram it into an embankment (fortunately only his pride was hurt).  So getting lumber has been a bit of a challenge and I will need to get something soon if I am to transport the plywood and avoid delivery costs.

With that said, I found two really nice 16' Douglas fir boards for the main mast at the local specialty lumberyard (Goosebay Lumber) yesterday and immediately hatched a plan to get them home.  I won't go into details, but it involved my wife's Mazda, a 14' aluminum ladder, and a lot of rope.  I should have taken a picture because it was pretty comical looking and marginally legal, but I got the boards home without issue (other than being $135 poorer).


Birdsmouth reprinted
from Duckworks Magazine.
The plans call for either a solid or hollow spar; I am opting for a hollow spar using the 'birdsmouth' method.  I've never built one before, but I'm pretty sure it's in my wheelhouse and there is a lot of literature out on the interwebs detailing the procedure. One of the better ones is on the Duckworks Magazine site here.  In a nutshell, making the birdsmouth spar involves cutting a bunch of staves, and then cutting a notch out of the end each one, making the profile look like a birds mouth (hence the name). You can use anywhere from five to sixteen or more staves to make the hollow spar, but I opted for eight because it is the easiest to cut the notch (it uses a 45 degree notch).

To get started I used the birdsmouth calculators on the Duckworks Magazine site to figure out my stave size.  The plans call for a 90mm section tapering to 50mm at the top so I just plugged in the number of staves (8) the outer diameter (90) and an inner diameter.  I chose 60mm based on at least 20% wall thickness.  I know that 20% of 90 is 72mm, but it came down to me being lazy.  To get the 72mm would mean that I would have to plane the boards down from 18mm to about 12mm and since my planer blades are really dull, I decided to say I am overbuilding the spar, and may trim the final outer diameter a little less than 90 (solid spar calls for 84mm).

Anyway once I figured out my H(18mm) and L(35mm) for the staves I ripped the two boards up into eight staves.   Once they were cut, I set the table saw to 45 degrees and ran a few test pieces through to dial in the depth of cut and the fence alignment.  I should say that there are a number of ways to cut staves to get the birdsmouth cut, but I am using the table saw method (it seems faster and less messy than a router).

Once I was satisfied, I had my son come over to the shop and help hold the unwieldy staves as they came off the saw.  Basically, you run the stave through the saw for the first 45 degree cut and then turn the stave around and pass it through again leaving a satisfying little 16' triangular piece of wood leftover waste.  It took about 20 minutes to run each of the eight 16' staves through the saw twice and once completed I plunked all of them into a series of 90mm semicircle forms clamped to the bench and stepped back to see the magic.  Woohoo!  Tomorrow I will work on the taper to reduce the final diameter from 90mm to 50mm over the top 1.5 meters and then wait for my 3 gallon epoxy order to show up in the mail.


Thursday, January 26, 2017

Squaring Away

I have a lot of crap.  I am not good at throwing away crap.  There, I've said it, but fortunately I have an opportunity for redemption with the new shop.  My old shop (in my basement) was less than half the size of the new space, but it was filled up with 10 years worth of scrap wood, various nuts and bolts and other assorted debris that I was reluctant to throw away because "it might just come in handy someday".

As it turns out, I really don't need that dishwasher motor, or the bag of 17/32 bi-metal washers, or really any of the odd collection of junk for that matter.  I guess that goes back to the days when I didn't have 2 cents to rub together and spending $3 on some washer was really extravagant.  So a lot of it is getting purged as I move everything over to the new space so I can start collecting a fresh pile o' crap.

As everything gets moved, I have been sorting into piles and either throwing them away or re-organizing to be stored in the new shop.  I've made a lot of progress, but there is still a lot to do.  The biggest win so far was sorting and organizing all the hand tools I hav
e.  There were a bunch of duplicates that are being put in a soft sid
ed tool bag that will stay over at the house for day to day "operations".  

I put up some pegboard along the back wall to store all the frequently used hand tools like saws, mallets, and screwdrivers and have found cubby homes for all the power tools at the miter saw station.  I also set aside a full drawer for drill bits, hole saws, and and bit mounted wire wheels, but I haven't come up with a good arrangement for the myriad of good fasteners I have, but will probably settle for a plastic case with sufficient storage.

I still need to move the compressor and the band saw over, but given the snow and ice we have right now outside the old shop door, it would be pretty treacherous to try and move them and will have to wait until it's not so slippery.

With any luck, I'll be able to start on boaty stuff in the next week or so; The first task I'm going to do on the Campion Apple build is to build the birdsmouth mast, and I hope to get the wood (either Sitka Spruce or Douglas Fir depending on price and quality) over the weekend.


Thursday, January 19, 2017

A New Boat

So after a seemingly endless period of searching and general hand wringing about the best possible design for a new build I have settled on the Campion Apple 16.  Originally, I kind of fell in love with the Caledonia Yawl and had planned to build that, and even went so far as to seek out a ride in one in Maine with Jeff Kerr (who builds them for a living).  I'm still in love with the design, but decided to pass on it for now because of a number of factors.  The first being cost; a bigger boat means more lumber and larger everything.  Part of that cost was figuring in that I would do a kit which has a fairly steep upfront cost.  Another reason was that I wanted to build something that wouldn't necessarily take as long if I was committed.  Finally, while I enjoyed sailing the Caledonia Yawl, it is first and foremost a displacement boat, and I am still nimble enough to want to have a boat that can get up on a plane and go when the wind is right.

The Campion Apple satisfied all of those requirements and I think it's a lovely design.  The plumb bow and yawl rig make it very distinctive and it exudes its Northern European heritage.  I will be building the stitch and glue form but it can be built clinker style.  I think it should be a fun build.

I've spoken with the designer Tom Dunderdale on several occasions now and he has been immensely helpful.  I purchased the plans last week and had several sets enlarged.  There will be some additional work that a kit boat would have eliminated; namely laying out and cutting each of the 5 strakes per side and an additional keel strake, but since I will be building it stitch and glue, no strongback is required and the hull should go together relatively quickly.  I hope to be staring in the next few weeks, but I still have some finishing details in the shop and some jigs to build to help the process along.  More details and photos of the design can be found at: Campion Sail and Design

Stay tuned....


Tuesday, January 10, 2017

Fitting Out

No boat work to speak of in the last few months but I have been picking away at the shop and getting it buttoned up for winter.  And speaking of winter, here in New Hampshire, it is in full swing and I'm happy to say that the shop is warm (relatively speaking) and ready for a new boat project.

My last post in the shop section detailed some of the stonework my neighbor and I were doing to get the soil stabilized.  Once that was done it was time to start focusing on getting the shop closed up to keep out the cold and any unwelcome visitors.  All the windows and side door were in but I had to build the barn doors before I could move any expensive tools into the area.

Because of our cold winters here I wanted something that was insulated and would give me a tight fit so I didn't freeze to death, so I came up with a 2x6 design sheathed in plywood with a R19 insulated core.  On the outside, the plywood would have cover boards to make them look like they should.

Hanging them was a bit of a trick (especially since I had no help that day), but with the help of a bunch of shims and some temporary fasteners I made out alright and got them hung and swinging without much difficulty.  I used the biggest hinges I could find without ordering something custom and I'm pretty happy with the way they turned out.  I finished up the outside by trimming out the windows and door openings with 3.5" barn board and called it done.

With everything all closed up it was time to get an electrician in to put a new service line in. This ended up taking entirely too long because the power company does everything at a snails pace and I ended up waiting for 3 weeks to get them to hook up power.

I worked out an arrangement with the electrician where he would install the meter socket, panel, and one outlet (1 simple circuit) and I would do the rest.  By the time I finished I added 2-20 amp circuits for south wall power and north wall power as well as 3-15 amp circuits for inside lighting (1st and 2nd floors), outside lighting,  I have an additional circuit ready for 220v should I need it, but right now I'm set.

Next up I bought 22 rolls of R-19 kraft faced insulation rolls and insulated the hell out of the shop space and covered the walls with sheetrock.  I'll probably sheetrock the ceiling at some point but it's good enough for now and I want to add some LED shop lighting to bench areas at some point and don't want to have to snake power behind sheetrock.

I had thought long and hard about bench configuration and while I originally thought 2 benches along each side would be good, I worried that there would be enough side to side room so I opted to shorten the space a little bit (28' -> 26') by putting one of the benches along the back wall.  I had originally planned on a wood stove on the back wall, but found that even on days where it is 10 degrees F out, a tiny electric heater was all I needed to warm up the shop sufficiently to work, so I ended up gaining space, allowing for a back wall bench.


The first bench was to be along the wall and I built out a dedicated miter saw station with storage and a built in fence with accurate measurements for duplicate cutting. On each end of the miter saw station I have a large work area that I can put my drill press and other assorted bench power tools.

On the back of the shop I built out a dedicated woodworkers bench with a large wood vice and holes for bench dogs on half of the length that spans the entire back of the shop.  I still have to build some shelving underneath both benches for storage of wood and other detritus that I tend to collect, but I'm ready to move in and get to work now.


Thursday, September 1, 2016

First Real Sail

I have been scheming all week to find a day that I could sneak away from work and family obligations to get the boat out for another sail. Today was that day and even though I didn't get out until 3:30, I ended up spending a solid three hours on the water.

Originally I was going to go up to Newfound Lake in Bristol, but time constraints kept me from making the 45 minute trip up and settled on Webster Lake in Franklin. In retrospect, I'm glad I didn't choose Newfound because it would have been pretty rough because it is a much larger lake than Webster and provides a longer fetch for the waves to build.

The forecast called for 8 - 12 kts, but when I showed up, the wind was clearly gusting higher than that.  Oh well, it's a nice day and the water's warm if I dump it.
I'm still figuring out the best way to rig and get going on a beach launched boat, so I'm sure I looked fairly ridiculous flopping around trying to get going.

Anyway, once out into deep water and feel the full effects of the wind the boat really started to kick.  Going upwind I was close to planing and slightly off the wind there was no question about it.  I was kicking up quite a rooster tail.  I wish I had the foresight to turn on my GPS to record speed, but my hands were pretty full. Remember that I'm used to big keel boats and planing sailboats is new to me (my 17' O'Day Daysailer comes close to planing but it has to be really windy).

What a blast.  I spent a good hour just reaching back and forth across the lake whooping as I got up on a plane each time.  The boat is obviously responsive, but the wind wasn't too gusty today so I didn't have much trouble balancing the helm and easing off when it piped up.  Two sunfish ventured out and I played with them for a while (I caught them both with ease), before trying a few gybes and some far off the wind tacks.

This is where things got dicey.  The gybes were ok, but heading downwind was an exercise in oscillation mechanics.  With the waves on the quarter, the boat would get pushed upwind a bit, and when I would counter the helm, the boat would roll back downwind.  I think it's called a 'deathroll' and even though I didn't actually capsize, I had a number of crash gybes as a result, and came really, really close to going in.

I learned a lot today. For starters, I need to work on tacks on such a small boat. To help with that I think having a cam lock for the mainsheet would help to free up a hand to help with moving.  I'm still waiting on my vang line that I inadvertently forgot to order along with the rest of the rigging, I suspect that could have helped out a bit today.  I definitely need to work on getting started off a beach and of course I need to figure out the whole downwind 'deathroll' thing.   Finally, I learned that in any kind of breeze you will NOT stay dry; which is ok by me.

Oops, my downhaul and outhaul are twisted.